Switching the light switch
Published 4:00 am Tuesday, February 26, 2013
- A colorful covering will ensure your switch covers and wall plates get noticed.
When we enter a room, we unthinkingly reach for the switch to turn on the light. We don’t take a second look; it’s just instinctive.
When you visit the home improvement store, you’ll notice switch plates and wall plates (for electrical outlets) in a multitude of configurations and finishes. Look for colorful plastics, shiny metals, mirrors and woods to coordinate with your walls and woodwork. But, ho hum.
Trending
Those ubiquitous switch covers and wall plates shouldn’t go unnoticed. In fact, they should get a second (or third) glance. The wall plates surrounding light switches and plugs are ideal canvases for art, and much can be done to get them noticed. Some plates are even oversized, giving you more room to create. If you’re a do-it-yourselfer, read on and think outside the box (electrical box, that is).
Clear covers
If your room is wallpapered, clear plastic wall plates allow the wallpaper to show through, and they keep the wall surface clean from constant touching. They also can be used with painted walls for the same purpose.
Some clear plates have a little “pocket” that allows you to put in photos or children’s artwork under safe cover.
Just trim to size, keeping in mind the cut-out space as you position the art within the plate cover.
Handmade and decorative scrapbook papers can also be inserted into the clear covers.
Trending
Paintables
If you have painted walls but aren’t fond of the shiny clear plates, check for paintable plate covers in the paint department of home improvement stores and brush on your wall color for a blend-together look.
Adding shine
If your little girl wants a glittery light switch, it’s easy to comply with her wishes. Simply purchase an inexpensive plastic plate, use a small foam brush to cover the surface with glue, and thoroughly cover it with loose glitter. Allow the plate to dry and then protect your glitter with a spray-on clear coating to prevent “sprinkling” with use.
Chalk paint
Perfect for a kid’s room, painting a plate with chalk paint (available at home improvement and paint stores) allows little ones to embellish their own plates using colored chalks. Design work can easily be erased and refreshed by your tiny Picasso.
Glow-in-the dark
Handy for guest rooms, bathrooms and for kids afraid of things that go bump in the night, glowing switch plates are easy to make. Simply spray or brush glow-in-the-dark paint onto an inexpensive plastic plate and allow to dry before mounting. Look for eerie orange, neon green and other tones that glow after being exposed to light.
Stickers
A walk through the scrapbooking department of your favorite fabric or craft store offers hundreds of opportunities for embellishing. Look for embossed and other specialty papers, stickers in all shapes and sizes, including lettering and crystals, and novelty punches to make your own shapes.
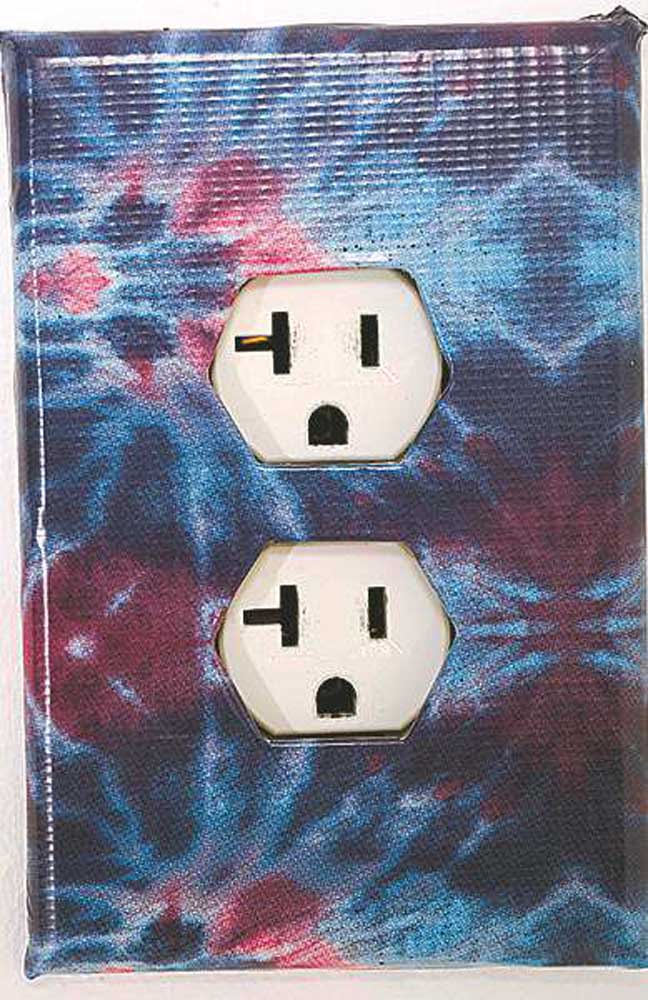
Duct tape
Duct tape is no longer just boring gray — it comes in a multitude of patterns and colors, and it’s available by the roll or by the sheet. Use it to entirely cover a wall plate, trim to make stripes and plaids, or punch out shapes to peel and stick. Just smooth the tape on the plate face and tuck under the edges. Note that duct tape cannot be repositioned, so be careful as you work. It also gums up the blades of scissors, so it’s best used with a craft knife.
Sharpies
Coupled with a bit of artistic bent, the ordinary Sharpie permanent marker becomes the tool of choice to draw on electrical wall plates. It’s fun not only for kids, but also for adults to try their hand at adding color and personalization to a room, and it’s fast and inexpensive.
Fabric
Almost any fabric can be used to embellish a wall plate, though lighter weight ones work the best to avoid bulky corners. Use a scrap of metallic, a decorator print or a favorite calico.
Wrapping it up
One of the easiest ways to embellish a switch cover plate or an electrical wall plate is to cover it, turning an inexpensive plastic plate into a piece of art. Plates can be covered with fabric, decorative papers including wallpaper and wrapping paper, as well as magazine clippings, photographs, maps and even newspaper.
To keep plates clean, spray the finished treatment with clear acrylic or polyurethane for protection.
To cover a plate, follow these simple steps.
1. Remove the plate from the wall if it’s already installed. Cover the surface with glue or spray adhesive.
2. Lay it right side down on the wrong side of the covering material. If you’re matching up patterning with a wall covering, pay attention to placement within the design compared to the wall.
3. For fabric, fold in the corners (like bed sheet corners); for papers and duct tape, notch out the corners to avoid bulk.
4. Wrap the edges tautly to the plate wrong side.
5. Adhere the cover wrapped edges to the plate back with spray adhesive, glue or wallpaper paste; duct tape is self-adhesive.
6. To cut the switch/plug opening(s), use a sharp craft knife and slice the covering with two or more diagonal lines. Wrap each covering piece to the plate back, trimming if needed. Glue or finger-press in place.
7. Gently poke a small hole where the screws go.
Use a cotton swab to dab coordinating paint onto the mounting screws. Remount the plate when the screws are dry.
To make coordinating switches and/or electrical outlets to match your artistic wall plates, simply spray them with a light coat of paint in a similar color to the plate.
Just for fun
Switch plates can become a time capsule of sorts. Write up a family history of the home and make it slightly smaller than the plate outline. Leave space in the type where openings will be cut out. Print the synopsis on an adhesive label and secure it to the inside of a switch plate cover. Remount the cover, and wait for it to be discovered in the future.
Marketplace


Best of the Best of Bend 2025

-
eEdition

-

-